Welcome to the very first and an introductory article on typesetting. If you happened to be from the scientific community, you must have gone through at least one document (maybe in the form of .pdf or a printed paper) which is the result of years of developments in typesetting. If you are from technical/research background, chances are that you have even typeset a document before using something called LaTeX. Let me assure you that LaTeX is neither the beginning nor the end of the entire typesetting ecosystem. In this article, I will provide a brief introduction to what typesetting is and what all modern tools are available for use. Specifically, the most popular members of the TeX family will be introduced, including LaTeX.
Although many people (including the ones who use it one way or the other) do not recognize this but typesetting is an art. Technically it’s defined as the process of arranging various symbols (letters, numbers & special characters) called glyphs on a physical paper or in a digital medium in a way that it is appealing as a reading material. I emphasized on that word “reading” because that’s the key - typesetting aims to produce documents that are pleasant to the human eye. You might ask, “So, what is the big deal here ?”. The answer is a set of (technical) terms/phrases which, I am pretty sure you haven’t even heard of. “Optimal line length”, “Ligatures”, “Italic correction”, “Hyphenation”, “Optimal spacing” etc. which, if not done right, may result in fatigue while reading. Please believe me at this point that there indeed is a science behind deciding what exactly is pleasant to the human eye and what’s not. I will try to illustrate few of them here:
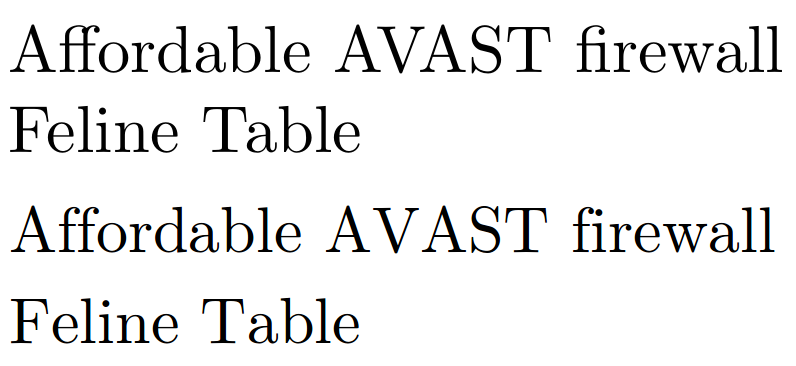
Have a looks at the example above with two lines with identical content but one (top one) produced by a typesetting system and the other one is by a word processor. Did you notice any visual difference ? Let me help you.
Ligature is a special glyph which is formed by joining two glyphs of two letters (or graphemes). Canonical examples of ligature are the grapheme pair “ff” and “fi” both of which happened to be present in the content of the example sentence. The typeset sentence use just one glyph for both “ff” and “fi” which is not the case with word processors.
(Non-)optimal spacing does affect the appeal of the text when read by human eye. The word “AVAST” clearly has more amount of spaces in between the letters in the later case which indeed is very awful. If you want more of it, look at character-pair “Fe” and “Ta” in the words “Feline” and “Table” respectively.
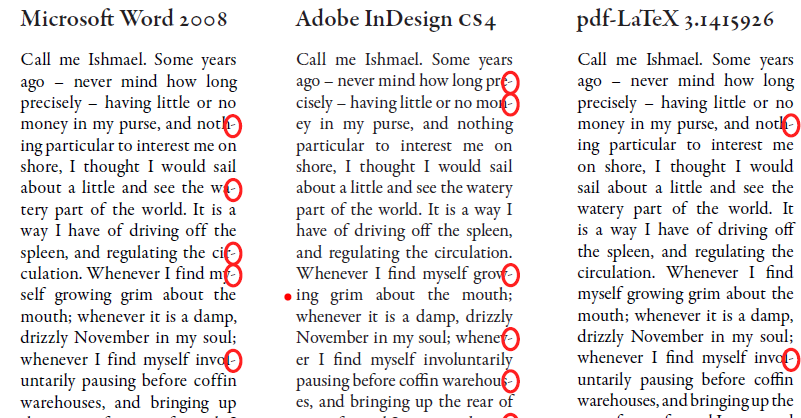
Hyphenation is defined as the process of breaking words between lines. A better hyphenation algorithm can produce much less breakage of words in a given paragraph. The reason word processors are not-so-good at it is their hyphenation algorithm works on a single line and not on the entire paragraph. The below example (Fig.2; taken from here) should be self-explanatory.
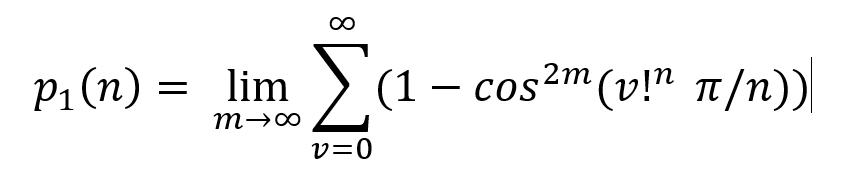
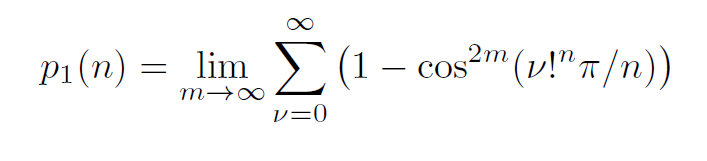
Typesetting mathematics is crucial when dealing with scientific documents. Scientific engineers/researchers will not be happy if their complicated equation looks ugly. Refer to Fig.3 for a visual comparison of equations.
There are many more of these. It’s difficult to discuss all of them here. If you are interested, read articles like this by expert typographers. In this article, I would rather focus on the tools available for digital typesetting.
Before we begin, it’s good to have an idea about how exactly these typeset documents are produced digitally. They are achieved by means of some specially crafted file formats:
Device Independent (
.dvi): DVI is a format created by David R. Fuchs and implemented by Donald Knuth as the primary output format ofTeX. DVIs are binary (encoded) files and are not intended to be readable as text. DVI viewers (e.g.xdvi) can recognize and display them.PostScript (
.ps): PostScript (in short, called “PS”) is a very popular format used heavily in publishing industry created by Adobe. PS is a page description language (yes, its a full-fledged programming language) that describes a page by means of its commands. It is readable as text because of the fact that it is a source code of a programming language.Portable Document Format (
.pdf): Here comes the beast. PDF is a widely used document format used .. well .. everywhere. Created by Adobe, this format is intended to be dependency-free and a complete description of the document including text, images (raster/vector), fonts and other assets.
## Digital typesetting and history of TeX :
Digital typesetting refers to the process of typesetting in digital medium and produce high quality printing material. So, a digital typesetting system must consume the content and formatting of the material we want to print and produce a DVI/PS/PDF which can then be used by the traditional printers.
It all started when this guy, Donald E. Knuth, felt the need of a reliable typesetting system because he had a bad experience with typesetting his book (The art of Computer Programming). Around 1977, while in Stanford, Knuth developed the very first version of TeX - a digital typesetting engine that allows users to describe the content and formatting of a printing material by means of text files and can produce .dvis. TeX (pronounced as tech) is much like a programming language which takes source code as inputs and produces a beautifully typeset document. Although TeX is a turing-complete programming language, it is mostly used as a description language which is flexible enough to describe not only content of the document but also granular formating details. TeX is highly popular in academia because of it’s ability to beautifully typeset mathematical notations and symbols. The core TeX engine uses quite sophisticated algorithms to address problems (the ones I described before like “optimal spacing”, “italic correction” etc.) which makes a document unpleasant to human eye. Although many things are automatic, TeX provides users with granular control over formatting details.
TeX : The core typesetting engine
Okay, enough of history and vague descriptions. Let me introduce you to the language of TeX. In case you want to follow along, please install any complete TeX-distribution (MikTeX, TeXLive etc.) and you’ll get all the required tools ready for use. Here’s a simple TeX program (adopted from the TeXBook):
% filename: story.tex
\hsize=3in
\centerline{\bf A Short Story}
\vskip 6pt
\centerline{\sl Ayan Das}
\vskip .5cm
{\parindent=1em
\indent Once upon a time, in a distant galaxy called `\"O\"o\c c, there lived a computer named R.~J. Drofnats.`}.

{\parindent=2em
\indent Mr.~Drofnats---or ``R. J.,'' as he preferred to be called---was happiest when he was at work typesetting beautiful documents using \TeX.}
\bye
if compiled with the TeX engine
prompt$ tex story.tex
This is TeX, Version 3.14159265 (MiKTeX 2.9.7000 64-bit)
(story.tex [1] )
Output written on story.dvi (1 page, 680 bytes).
Transcript written on story.log.
produces a .dvi which when opened with a DVI viewer, will look like this:
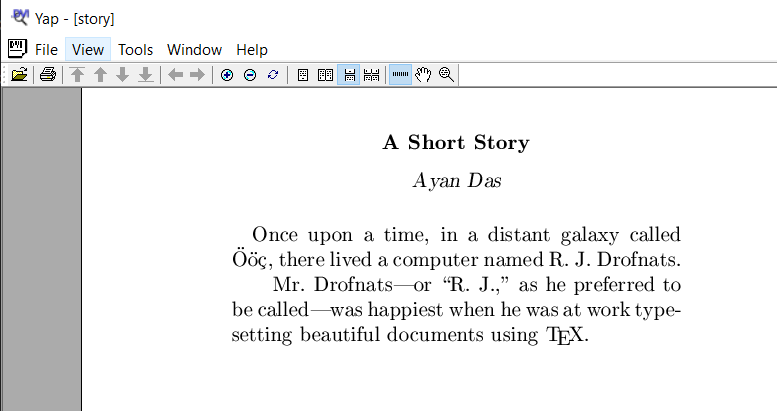
Although, the whole point of this tutorial is not to teach you TeX in detail, but I do want you to get a feel of how TeX accomplishes fine-quality typesetting programmatically. Here goes the explanation of the source code:
- The very first control sequence (yes, that’s what they are called)
\hsizedetermines the width of the text area. Look how narrow the text is; its just 3 inches ! - Control sequence
\centerline, as you can guess, centers a text. That\bfis there to make all texts boldface inside its enclosing braces. Try to guess what that\slin the next-to-next line is for. - Couple of
\vskips are there to make vertical gaps. We can use several units of length (inches, point etc.) as per our convenience. \parindentdecides how much space to put for paragraph indentation. The first paragraph has a\parindent=1emand the next one has\parindent=2emwhich is quite evident from the output.- Did you notice the accents and how they are written in the source code (
\"O\"o\c c) ? - The
~sign represents a single space but with an extra instruction given to TeX to not break the line at that point while running it’s optimal line breaking algorithm.
I seriously have no intention to make it any longer, but I can’t resist myself to show you the level of granularity TeX offers:
- The control sequence
\centerlineis not a primary one - it is defined using a more fundamental concept called Glue. Think of them as virtual springs which have stretchability and shrinkability. Think of the centering of a text as putting two identical springs of infinite stretchability horizontally on both sides of the text. In the equilibrium, the text will be centered. Seems strange, right ? That\centerlinecan then be (roughly) defined as
% This is how you define a control sequence with one argument
\def\centerline#1{
    \hskip0pt plus 1fil #1\hskip0pt plus 1fil
}
where those \hskip0pt plus 1fils are the two glues/springs I mentioned earlier. Try to figure out what it exactly means (Hint: 1fil means a length of “Infinity with strength 1”).
- Another control sequence I want to bring your attention to is that
\TeXat the very end of the second paragraph that produces the specialTeX-logo. It might seem like a primary command but it’s not - proper placing of that ‘E’ can be done with more fundamental commands like\lowerand\kern:
\def\TeX{
    T\kern-.2em\lower.5ex\hbox{E}\kern-.13em X
}
\kern is there to produce a given amount of horizontal space. A negative number will cause the next character to overlap. \lower, as you can guess, is for lowering the following box from its horizontal baseline by the given amount.
I hope I have successfully conveyed the essence of TeX and the granularity/flexibility it offers. We will now move on to other members of TeX family.
LaTeX : A layer of abstraction
If you have ever heard about or worked with any one member of the TeX family, chances are, it is LaTeX. LaTeX was designed by Leslie B. Lamport (LaTeX happened to be an abbreviation of Lamport TeX) around 1983 as a document management system. It focuses heavily on separating the content from formatting as it helps users to focus more on the content. LaTeX is technically a gigantic macro package of TeX whose primary motive is to provide users with document management capabilities like “Automated page numbering”, “Automatic (sub)section formatting”, “Automatic Table-of-Content generation”, “Easy referencing mechanism” etc. This allows users not to worry about putting proper page numbers every time they create a new page or adding a new entry in the Table-of-Content every time they add a new section in the document.
Plain TeX would require you to do at least this much to produce a numbered list:
{\parindent=2em
\indent 1. First point}
\vskip1em
{\parindent=2em
\indent 2. Second point}
\vskip1em
{\parindent=2em
\indent 3. Third point}

\bye
whereas LaTeX’s abstraction will allows you to have much more focus on the content rather than formatting details. Here’s how you would do it in LaTeX
\begin{enumerate}
\item First point
\item Second point
\item Third point
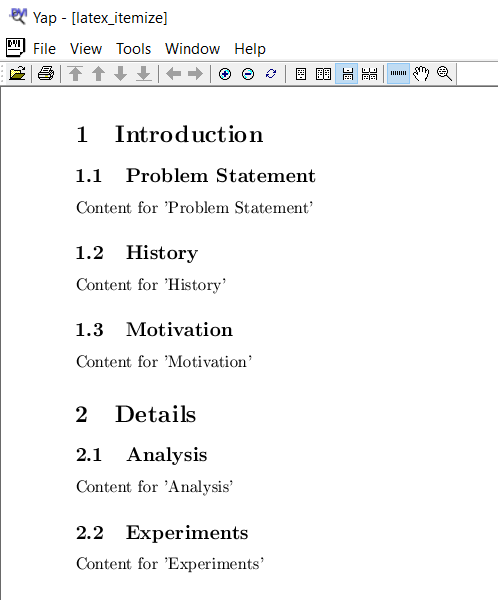
\end{enumerate}Apart from being more readable and content-focused, the LaTeX version is much more feature-complete as it handles all possible situations you might get into. Similarly, (sub-)sectioning is just as easy:
\documentclass{article}
\begin{document}
    \section{Introduction}
        \subsection{Problem Statement}
        Content for 'Problem Statement'
        \subsection{History}
        Content for 'History'
        \subsection{Motivation}
        Content for 'Motivation'
    \section{Details}
        \subsection{Analysis}
        Content for 'Analysis'
        \subsection{Experiments}
        Content for 'Experiments'
\end{document}
will produce
pdf(La)TeX : The PDF variants
There exist two members of the TeX family, namely pdfTeX and pdfLaTeX, which are essentially similar engines as TeX and LaTeX respectively but produces .pdfs directly instead of .dvis. They may use some modern/advanced features that only PDFs offer. These two are extremely popular as the demand for .pdfs are significantly higher than that of .dvis. pdf(La)TeX is a separate program and implemented independently from (La)TeX. They can accessed via command line programs
prompt$ pdftex file.tex
# produces file.pdf
and
prompt$ pdflatex file.tex
# produces file.pdf
LuaLaTeX : When LaTeX meets Lua
A successful attempt of extending the pdfTeX engine by embedding Lua in it was LuaTeX (beware of the spelling, it’s not LuaLaTeX). This engine, if used with the LaTeX format, assumes the name LuaLaTeX. Lua(La)TeX is primarily used when a little more dynamicity/flexibility is required in the source code. Now that we understand how a (La)TeX programs look like and how they work, I will directly go on showing some code rather than beating around the bush.
Before that, I would like to bring your attention to something which (La)TeX is not so good at. La(TeX) is known to be difficult when it comes to general purpose programming. To express very basic logics of programming, TeX needs a lot of unnecessary commands which are neither convenient nor readable as a source code. One very important logical block that almost every sensible program contains is a for loop. Here’s what TeX and LaTeX needs respectively in order to accomplish it.
\newcount\myvar % a command to define a variable
\myvar=1
\loop
\the\myvar % a command to access a variable, I mean seriously !
\advance\myvar1
\ifnum\myvar<5
\repeat
\bye
and
..
\usepackage{forloop}
..
\newcounter{ct}
\forloop{ct}{1}{\value{ct} < 5}
{
  \thect\
}
If interested, you may try to read and understand it line by line. But we can agree on one thing - it’s nowhere near convenient or readable. Although the later one is somewhat easy to interpret, but it takes a separate package (called forloop) to get to it.
Now, here’s how Lua helps.
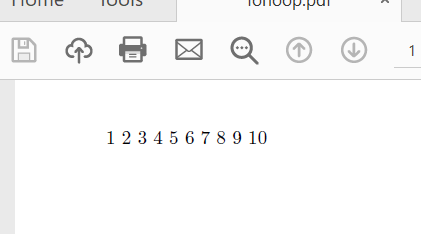
\documentclass{article}
\begin{document}
    \directlua{
        for i = 1, 10
        do
            tex.print(i .. ' ')
        end
    }
\end{document}
You can see the very basic LuaLaTeX command that makes the bridge between LaTeX with Lua is at work here. \directlua enables users to write arbitrary Lua code inside it. Here’s how it works:
- The engine halts interpreting the usual LaTeX commands (i.e., stops typesetting) once it has encountered a
\luacodeblock - The code inside this block is then fed into a special Lua interpreter for execution.
- The special
tex.print(..)function (sameprint()API from standard Lua) injects the characters into a special output stream. - The
\luacodeblock is then replaced by the content of the output stream. - LaTeX engine starts its typesetting again from where it was halted.
Take a moment to digest this. Hopefully the explanation is clear enough to understand why the output looks this this
Constructs are available to define pure Lua functions as well. Also, convenient mechanisms are built to translate arguments given to a LaTeX command into equivalent Lua objects. A concrete example is shown below:
\documentclass{article}
\usepackage{luacode}

\begin{luacode*}
    function intro_helper_tex(name)
        tex.print('Hello, my name is ' .. name .. '. I love \\TeX')
    end
    function intro_helper_latex(name)
        tex.print('Hello, my name is ' .. name .. '. I love \\LaTeX')
    end
\end{luacode*}

\newcommand{\intro}[2]{
    \directlua {
        if \luastring{#2} == 'tex' then
            intro_helper_tex(\luastring{#1})
        elseif \luastring{#2} == 'latex' then
            intro_helper_latex(\luastring{#1})
        end
    }
}

\begin{document}
    \intro{Ayan Das}{latex}
\end{document}
\begin{luacode*} .. \end{luacode*}is an environment to put pure Lua definitions. In our example, there are two functions namelyintro_helper_tex(..)andintro_helper_latex(..).- To understand the reason for escaping the backslash, go and read the 4th point of the earlier explanation very carefully. The output stream generated by the
tex.print(..)s has to be valid (La)TeX code in order to be successfully parsed subsequently by the LaTeX engine. Escaping the backslash produces “” as a string in the output stream which is a valid (La)TeX command. - Coming to the custom command named
\intro, it takes 2 inputs - your name and favorite TeX format. They are translated to Lua strings via\luastring{#x}wherexis the argument number of\intro. - Depending on the second argument, the
if .. elseif .. endblock choses one of the two Lua functions defined earlier.
The output of the above program, if compiled like this
prompt$ lualatex funcarg.tex
This is LuaTeX, Version 1.10.0 (MiKTeX 2.9.7000 64-bit)
 restricted system commands enabled.
(./funcarg.tex
LaTeX2e <2018-12-01>
...
Output written on funcarg.pdf (1 page, 7187 bytes).
Transcript written on funcarg.log.
is
Phew ! That was a hell of a lengthy tutorial; but hopefully conveys the essence of typesetting and the TeX family of tools. All the members of the TeX family are themselves huge systems to learn about. With the introductory ideas given in this tutorial, it will be easier to read their official documentations available online.